Fall Wreath Tutorial
We’re finally entering my favorite time of year! I have been eagerly looking forward to decorating our new home for fall since we first moved in. Our old wreath didn’t make it through the move, (oh darn) so I’m thrilled to create a fresh fall wreath for our new space. This year, I’ve incorporated rich fall colors with a touch of blue and added some charming velvet pumpkins to our fall wreath. Follow this fall wreath tutorial to design and make your beautiful fall wreath!
Affiliate Disclaimer: In the name of full transparency, as an Amazon Associate I earn from qualifying purchases. Please be aware that this blog post contains affiliate links and any purchases made through such links will result in a small commission for me (at no extra cost to you). For more information see my Legal page.

Supplies for Fall Wreath Design
I love shopping for all the supplies we need to build our fall wreath. I usually have a rough idea of the colors I am looking for so I can focus while shopping. My husband went to the store with me, he was pretty helpful even though he was bored out of his mind. 🙂
Walking through all the aisles before grabbing anything gives me an idea of what is available while looking for inspiration. Sometimes I look for a cute charm or a larger piece to build off of. This time I came across the floral pick with the velvet pumpkins. They were well-made and looked adorable. I also found the blue thistle picks and had to have them. I am a big fan of a sweet depressed donkey and every time I see thistles I think of him and buy them.

After I had those two elements I walked around looking for colors and textures that would help them work together on my fall wreath. I over-bought supplies but have plans for a centerpiece using these materials, using little touches of the same decor around the house gives a cohesive look to your decor. I got three large picks of each and grabbed a few extras of the greenery just in case. Other than the fun stuff you will need a wreath form, floral wire, pliers, and wire cutters. I loved this vine wreath on site but other options are looser vine like this one, foam, or wire frame like this one.
Floral Pick Preparation
Prepare your floral picks for your fall wreath by breaking them down into smaller sections. This way they go further and you can mix textures more efficiently. You can see below that I use my wire cutters to cut each stem off the main stem and then set them in stacks around my workspace. Often I arrange everything in alternating colors so my eye doesn’t skip over like colors.


Newsletter Sign Up
Stay in the loop with our weekly email newsletter—filled with inspiring projects and delicious recipes. And don’t worry, we respect your inbox—no spam, just great content.
Fall Wreath Design Process
Now for the fun part…play! This is a great time to go crazy with ideas, don’t think, this is art and it is meant to be varied not a pattern or perfect. I like to place picks in different combinations until I find a look that I like and can improve upon. The options are endless for your fall wreath so make it fun and don’t stress about tiny details.
First Design
In my first design, I just grabbed colors, leaves, and textures and mixed them all. I thought it was pretty but wanted to try something that made some of the vine wreath visible. To keep track of my progress, I took a reference picture so I can revisit this design if needed.

Second Design
The vine wreath is beautiful and it was a shame to cover it up entirely. Here I arranged a much smaller amount of floral pics just on the bottom of the wreath and liked this look but it felt a little empty. On to another design after taking a quick reference picture.

Third Design
This time I was a little more organized with placement. I found that I kept grabbing the fluffy textured cream and yellow flowers and decided to use them as a main base. I began to add the other style of flowers and leaves to the wreath until I was happy. While this example is a little messy it hit the right balance of fluff and structure for me.

Attaching Elements
Once I decided on the design I liked I took all the elements off (I did have a reference picture again) and began to properly secure each element to the wreath. We live in a very windy area and while our porch is covered it can become a wind tunnel I wanted everything to be securely attached.
First Stage: Securing Floral Picks
Firstly I trimmed the wire on the picks so they fit comfortably on/in the wreath.

I then used wire to secure each pick to the vine in at least two places. This is thin floral wire looped around a vine and then twisted to secure. I trimmed the wire and tucked it into the wreath as much as possible without letting it go through to the back of the wreath. You don’t want that wire scratching up your door, they will move every time you open or close your door and when the wind picks up.
Hot Glue Option
Crafters frequently use hot glue instead of wire for ease of use. I burn the heck out of myself every time I use hot glue and find that it is not as secure as I would like for something outside in the elements. The hot glue strings that you have to clean up when finished are annoying and an extra step I would rather skip. Using wire also means I can redo this wreath in the future without having the wreath form full of glue or damaged.

Base Floral Pick Application
After repeating this process around the wreath I took a step back and loved it.

Final Floral Pick Placement
At this point, I added the elements that I wanted included and adjusted as needed.
Taking a step back to look at your work is a good practice, you will notice if the placement of an element is off or too close to other items easily. I do this with all of my projects or I will walk away for a bit and return with fresh eyes. Make your adjustments as needed and secure each piece with wire like before.
Side Note: Feeling stuck or frustrated with your design? Sometimes the best thing to do is step away for a bit. Take a break, grab a snack, or stretch. Pushing through frustration can lead to mistakes or burnout. Come back refreshed, and you’ll find your creative flow again!

Finished Fall Wreath
Ta Da!
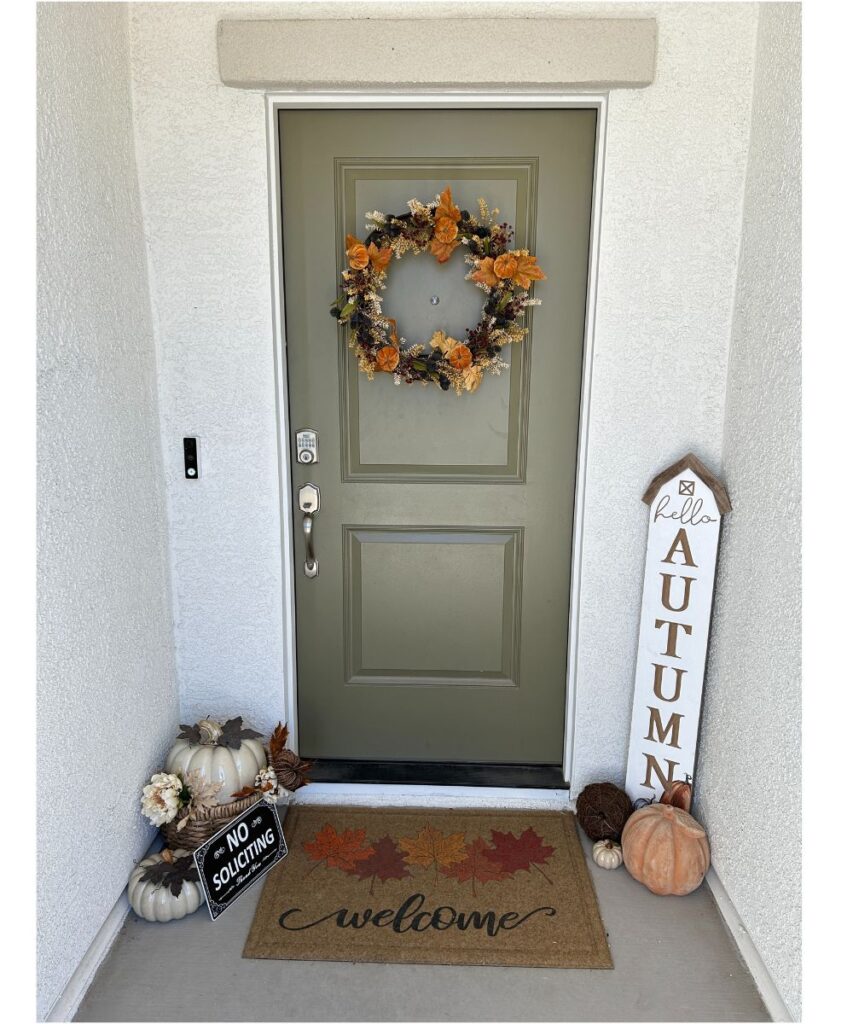
Here’s the finished fall wreath on our front door. I’m known for tweaking decor throughout the season, but I try not to obsess over every little detail. This time, I didn’t because I took the time to play with the design first and fully committed to it. If you’re unhappy with your result, don’t hesitate to cut the connecting wire and start over—perfection isn’t the goal, enjoyment is. Keep experimenting until you love what you’ve created.
To hang your wreath, choose the method that works best for you. I use a hook (I use this one)that stays up year-round since I love having a seasonal wreath on display all the time. I created a small loop at the back of the wreath to attach it to the hook, but you can use a ribbon or tie if that fits your style better.

Newsletter Sign Up
Stay in the loop with our weekly email newsletter—filled with inspiring projects and delicious recipes. And don’t worry, we respect your inbox—no spam, just great content.
Affiliate Disclaimer: In the name of full transparency, as an Amazon Associate I earn from qualifying purchases. Please be aware that this blog post contains affiliate links and any purchases made through such links will result in a small commission for me (at no extra cost to you). For more information see my Legal page.
Finished Fall Porch Decor
Here’s our decorated fall front porch!
Now that I see it all together, I’m considering adding some leftover floral picks to the existing decor to make the wreath blend seamlessly with the overall look. It is ok to keep playing until you like your result. Frequently I will give myself a few tries and then say it’s done.

How do you determine when your decor is complete? Is that a thing? My style changes from year to year and love adding a little something new every year. Check out my Holiday page for more seasonal posts.
I hope you enjoyed this Fall Wreath Tutorial as much as I did making it. I would love to see your fall wreaths, share your wreath pictures in the comments or on any of my social media accounts, and tag me! #christyathome

Stay up to date on social media.
Newsletter Sign Up
Stay in the loop with our weekly email newsletter—filled with inspiring projects and delicious recipes. And don’t worry, we respect your inbox—no spam, just great content.


Leave a Reply